Receive SMS on a website (PHP)
This guide explains how you can create an SMS service using PHP that processes incoming SMS messages. It explains the configuration of the SMS gateway and gives you instructions on how you can process SMS messages in your PHP script. The guide is aimed at software developers who are familiar with the PHP programming language.
Introduction
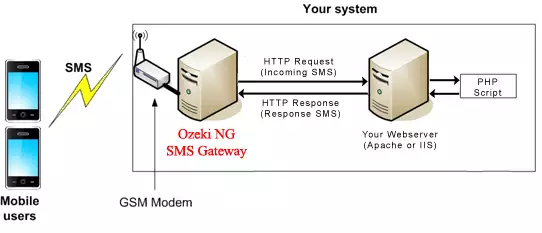
PHP is usually used in web development environments. It is quite common that a PHP script is called when a webpage is requested. Often this PHP script is interacting with a database, such as MySQL to store and retrieve information to be displayed on the website. The solution I am going to present here for SMS messaging assumes you are hosting your PHP script on a webserver and you prefer to receive SMS messages over HTTP request. If your PHP script is using a database server for data storage, you might want to consider to setup an SQL SMS Gateway for sending and receiving SMS messages. This topic is covered in detail in the following guide:
SQL - SMS Gateway. This guide gives instructions on how you can create an HTTP - SMS Gateway configuration based on Ozeki NG SMS Gateway (Figure 1).
Getting started
To start first you need to setup a hosting environment for your PHP script. This includes the installation of the following components:
1.) Apache webserver2.) PHP programming language
You also need to download and install Ozeki NG SMS Gateway!
 |
Ozeki NG SMS Gateway can be obtained by opening the download page: Download Ozeki NG SMS Gateway! |
After these components are installed, you will have a WWWRoot directory that can be used to host PHP scripts. I assume you have configured Apache to use "C:\www\" as the WWWRoot directory.
Testing your hosting environment
To test your hosting environment save the smsresponse.php PHP script inC:\www\.
C:\www\smsresponse.php
<?php

  $sender = $_GET['sender'];
  $message = $_GET['msgdata'];

  if ($sender!='') {
     #
     # Save incoming messages
     #
     $fp = fopen("receivelog.txt","a");
     fputs($fp,"$sender $message\n");
     fclose($fp);

     #
     # Return a response SMS message
     #
     $responsetext = "Thank you for the message!";
     echo "{SMS:TEXT}{}{}{".$sender."}{".$responsetext."}";
  } else {
     echo "The PHP script is ready for accepting messages";
  }

?>
|
Figure 2 - Source code of the PHP SMS receiver script
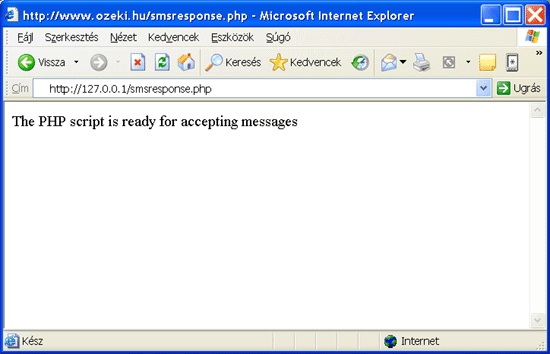
If you have saved the smsresponse.php file into your WWWRoot directory (C:\www) you can test your script by using Internet Explorer. In Internet Explorer you should open the URL pointing to your script. This URL is:
http://127.0.0.1/smsresponse.php
If your hosting environment is working and your PHP script is successfully installed, you should see the following text: "The PHP script is ready for accepting messages" (Figure 3.). This text is displayed in your browser.
Configuring the SMS Gateway
Once your PHP script is ready for accepting incoming messages, you should install and configure the SMS gateway. The SMS gateway will pass incoming SMS messages to your PHP script using HTTP requests, this is why we call this configuration HTTP-SMS Gateway configuration. To install the SMS gateway you should perform the following steps:
- Step 1: Download Ozeki NG SMS Gateway.
- Step 2: Install the SMS gateway
- Step 3: Configure your GSM Modem
- Step 4: Send an SMS message to test your modem
- Step 5: Receive an SMS message to test incoming message handling
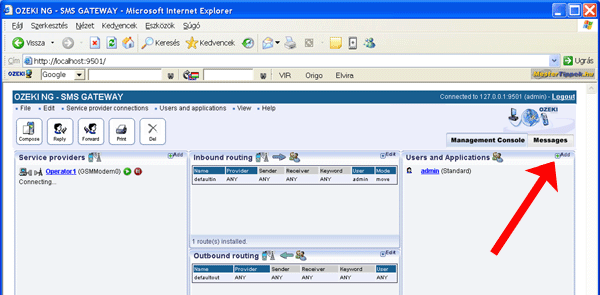
After these steps are complete you can configure the SMS gateway to pass incoming messages to the smsresponse.php PHP script. Incoming messages will be forwarded to this PHP script using the HTTP GET method. The SMS Gateway has an HTTPClient user that has the functionality we need. To get the HTTPClient user to work for us we need to add it to our configuration. To do this click on "Add" in the top right hand corner of the "Users and Applications" panel of the SMS Gateway management console (Figure 4.).
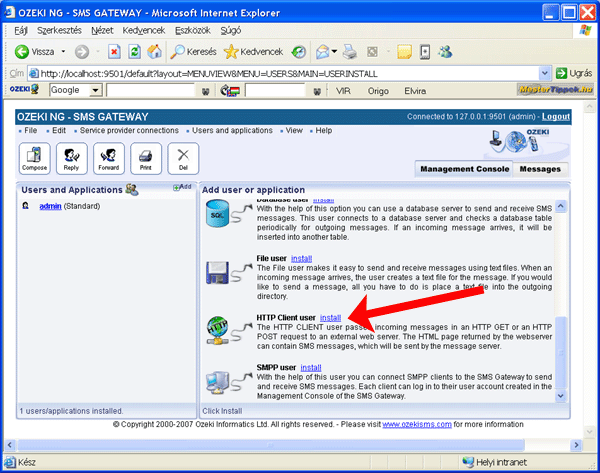
This will bring up the "Add user or application" form. In this form you should select the HTTP Client user and click on install (Figure 5).
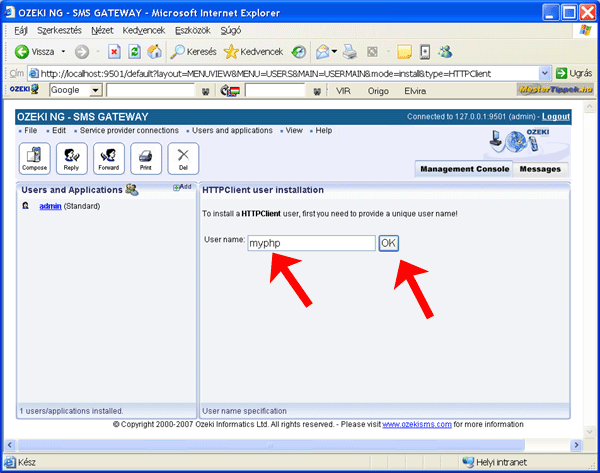
To install the HTTPClient user you need to provide a unique user name. I recommend to use "myphp" for this (Figure 6). Ozeki NG SMS Gateway allows you to configure many HTTP client users. This is useful if you wish to use many different PHP applications. You can configure one HTTP Client user for every PHP application that is responsible for providing SMS services and you can use the inbound routing configuration to decide which messages should be received by which user.
After the HTTPClient user has been created, you should configure the URL that points to your PHP application (Figure 7). In our case this will be:
http://127.0.0.1/smsresponse.php?sender=$originator&receiver=$recipient&msgdata=$messagedata&recvtime=$receivedtime&msgid=$messageid
Please note that this URL contains keywords, such as $originator, $recipient, $messagedata, etc... These keywords will be replaced in the URL to the actual values of the incoming messages before the URL is called to forward the message to your PHP script. A complete list of keywords you can use is listed in the HTTP Client user documentation.
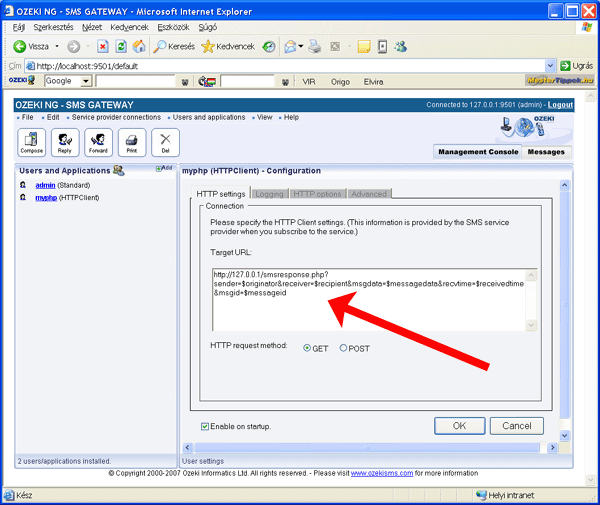
After setting the URL your system is ready to operate.
Testing your configuration
If you wish to test your configuration, the first thing you want to do is to see the HTTP communication between the SMS Gateway and your PHP script. To see this communication, you should enable "low level communication logging" in the HTTPClient user configuration form. You can enable low level communication logging by clicking on the "Logging" tab (Figure 8) of the form and checking the "Log low level communication" checkbox.
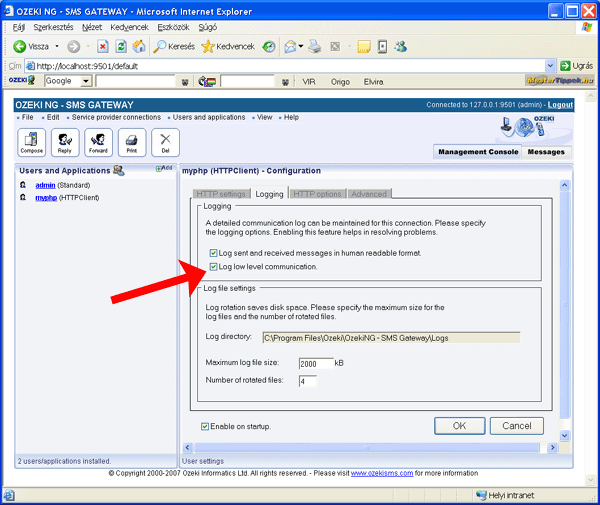
After the low level communication logging is enabled you are ready to send your first SMS message. When you send your SMS message to the system from your mobile phone, the GSM Modem connection of the SMS gateway will receive it (Figure 9). The GSM Modem connection will forward the message to the inbound routing table. The inbound routing table will find the matching inbound routing rule and will forward the SMS to the HTTPClient user. The final step is performed by the HTTPClient user who will forward the message to the smsresponse.php script using an HTTP GET request.
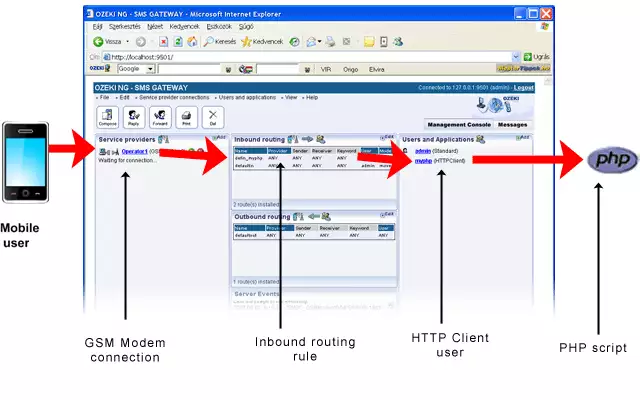
Figure 9 - Testing the pipeline
Checking the logs
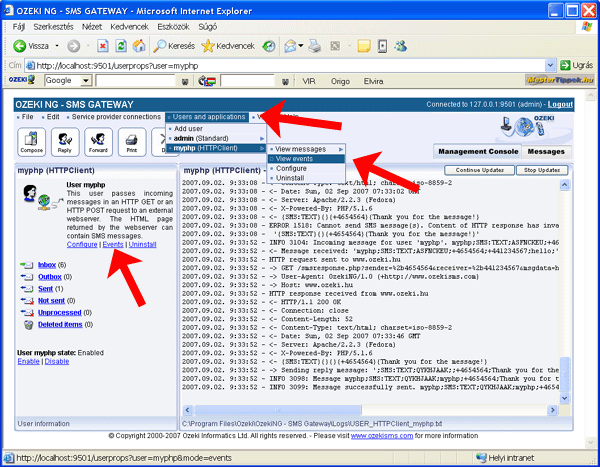
Since you have enabled low level communication logging in the HTTPClient user configuration form you can use the event viewer of the SMS Gateway to see the HTTP request that was used to pass the message to your PHP script. The event viewer also displays the HTTP response, which is useful if you are looking for errors. The event viewer can be opened in two ways: You can use the menu (Figure 10) or you can click on the "events" link in the user data sheet.
More information
- How to send SMS from a website using PHP and MySQL
- How to send a business card (Vcard SMS) from PHP
- How to receive SMS on a website using PHP API
- Two way SMS solutions using PHP and HTTP API
- How to send SMS from a website using PHP API
- How to add SMS functionality to a website using PHP API
- Send SMS from PHP using HTTP
- FAQ of the Ozeki NG SMS Gateway

 Sign in


