How to send SMS messages in Ozeki NG SMS Gateway
On this page you can learn how to send SMS messages in Ozeki NG SMS Gateway. The article lists the possible methods of composing a message, and you will also find the available message types that can be sent from the SMS gateway software. All of them are demonstrated with screenshots about their compose windows that will show how to fill these forms to be able to send out messages.
SMS sending function is also available in the "Management Console" and "Messages" view in Ozeki NG SMS Gateway. You can start this function if you click on "File menu" in the main menu and select "New message" option. In this way a "Compose a text message" window appears.

In "Management Console" and "Messages" view you can also achieve a message compose window with one click if you click on "Compose" icon as it is available in both views (Figure 2).

Both possibilities will reach the same "Compose a text message" window (Figure 3).
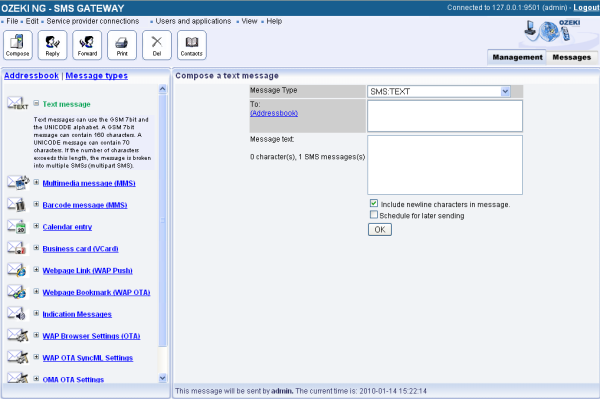
At the left hand side of this window you can find "Message Types" option that enlists all the available message types in Ozeki NG SMS Gateway. You can select from the following listed types:
- Text message: Text messages can use the GSM 7bit and the UNICODE
alphabet. A GSM 7bit message can contain 160 characters. A UNICODE message
can contain 70 characters. If the number of characters exceeds this length,
the message is broken into multiple SMSs (multipart SMS). To send SMS message
you need to complete this form. First provide the phone number of the
recipient(s). You can use the addressbook
of the software that makes selecting
multiple phone numbers easier and faster. Then compose the body of the message.
Under this text box you can schedule your message for later sending. If
you finish, click on "OK" to send your message (Figure 4).
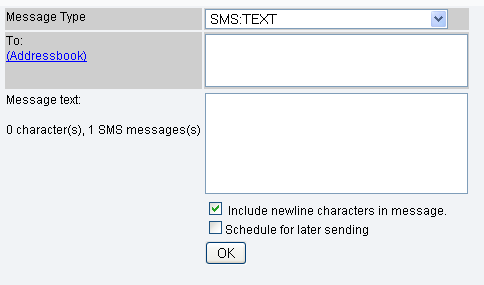
Figure 4 - Text message type - Multimedia message (MMS): The multimedia message can be used to
send picture, sound, video and text to mobile phones. To send an MMS message
first enter the phone number of the recipient(s). To speed up this process
you can use the addressbook of the software. Provide a subject for your message
and compose the body of your message. Under the text box you can attach numbers
of multimedia contents to your message. Below you can enable the delivery and
read report of your message and set its priority (High, Normal, Low) and its
message class (Personal, Informational, Advertisement). Finally click on "Send"
to send your message (Figure 5).
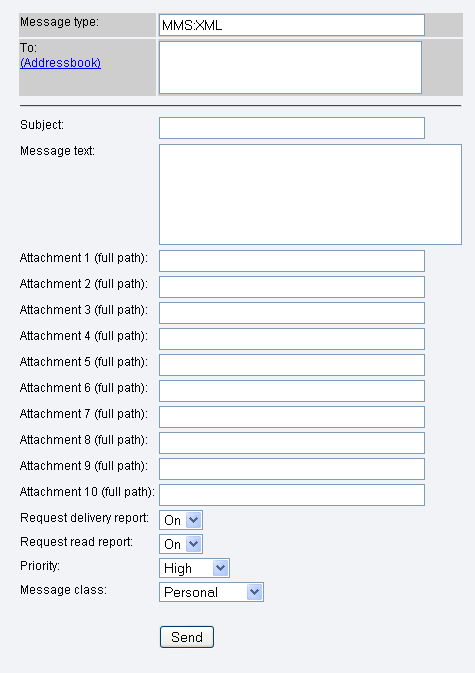
Figure 5 - MMS type - Barcode message (MMS): This barcode message can be used to send
an EAN13 barcode to mobile phones. Specify the phone number of recipient(s).
You can use the addressbook tool of the software to make this process faster.
Then provide the EAN13 code (European/International Article Number). Finally,
you can compose the text of your message but this part is optional. Click on
"Send" to send the message (Figure 6).
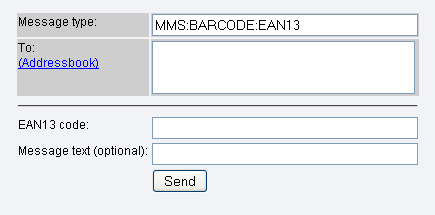
Figure 6 - Barcode type - Calendar entry: This type of message can be used to send a
calendar entry to a mobile phone to remind the user of an important date.
First specify the phone number of the recipient(s). In case of more than
one recipient you can use the Addressbook function of the software to speed
up this process. Then you can enter a description on the entry. Finally,
define the "Start Date and Time" and "End Date and Time" (Year, Month, Day,
Hour, Minute, Second). Click on "Send" to send your entry (Figure 7).
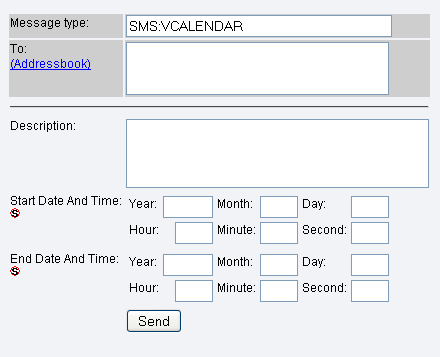
Figure 7 - Calendar entry type - Business card: This type of message can be used to send an
electronic business card to a mobile phone. It allows you to transfer
information such as names and phone numbers, homepage URLs and dates
of birthday to a vCard-aware mobile phone. First specify the phone number
of the recipient(s). In case of more than one recipient you can use the
Addressbook function of the software to speed up this process. Then you
need to provide data that is essential on a business card: Family Name,
Given Name, Phone (Home), Phone (Work), Mobile Phone (Personal), Mobile
Phone (Work), Fax, E-Mail, Homepage URL, Birthday (Year, Month, Day). You
can also write a note to your business card for the recipient. Click on
"Send" to send the business card (Figure 8).
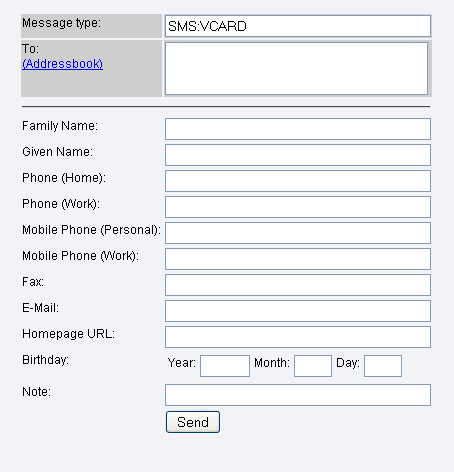
Figure 8 - Business card type - Webpage Link (WAP Push): Send webpage URLs, which can simply
be opened on a mobile phone. After you specified the phone number of the
recipient(s) (you can use the Addressbook to do so), you need to enter
the "WAP URL" you want to send. Then define the "Signal Action" (High,
Medium, Low, None, Delete). Compose the body of your message and click
on "Send" to send it
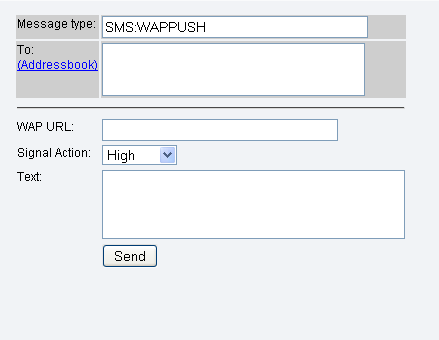
Figure 9 - WAP Push type - Webpage Bookmark (WAP OTA): Send bookmarks of any kind, which
can be used for browsing. First, you need to provide the phone number of
the recipient(s). To speed up adding phone numbers one by one, you can use
the Addressbook function. Then, define "Bookmark name" and "Bookmark URL",
finally, click on "Send" to send your message (Figure 10).
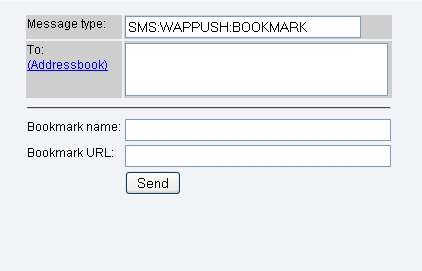
Figure 10 - Webpage Bookmark (WAP OTA) type - Indication Messages: An indication message is a type of message
that is sent to indicate the arrival of a voicemail message, a
fax, an e-mail or a video message. The indication for these different types
of messages can be specified separately or together. First, you need to
select from the list which
type of indication message you want to specify:
Voice Message Indication
Fax Message Indication
E-Mail Message Indication
Video Message Indication
Combined Message Indication(s)
Then you need to enter the phone number of the recipient(s). In case of more than one recipient you can use the Addressbook function of the SMS gateway to speed up this process. You need to define the "Indication Type" (Set, Clear), "Message Count", "Message Text" and click on "Send" to send your message (Figure 11). In "Combined Message Indication" message you can specify the indications together and you need to define the "Indication Type" and "Waiting Message(s) Count" for each types of indications. Finally, you can compose the body of your message and click on "Send" to send the message.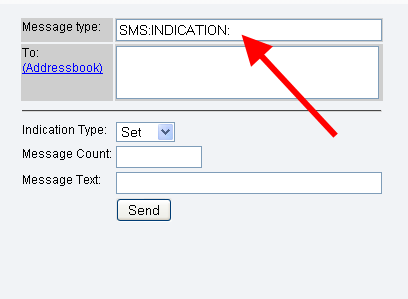
Figure 11 - Indication message type - WAP Browser Settings (OTA): Browser settings are used to provide
handsets with basic settings needed to establish a connection to be used for
browsing. You can select from the following connection types:
GPRS connection
GSM/CSD connection
GSM/SMS connection
GSM/USSD connection
IS-136/CSD connection
In case of GPRS connection you need to enter the phone number of the recipient(s). You can use the Addressbook that helps speed up this process. Then provide the following information in the respective lines: Name of Settings, Connection Type (GPRS), GPRS Access Point Name, GPRS Login Mode (Automatic, Manual), GPRS User Name, GPRS User Password, GPRS Login Type (PAP, CHAP, MS-CHAP), WAP Gateway IP Address, WAP Gateway Login Mode (Automatic, Manual), WAP Gateway User Name, WAP Gateway Password, WAP Gateway Connection Type (Connectionless, Connection-oriented, Connectionless (WTLS), Connections-oriented (WTLS)), Homepage URL, MMS Message Server URL. Click on "Send" to send your message.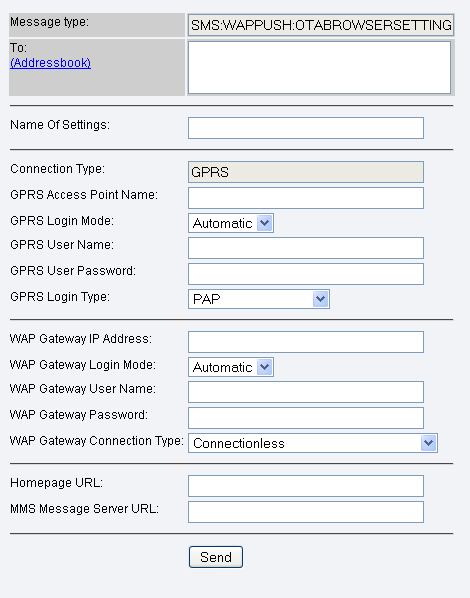
Figure 12 - WAP Browser Settings, GPRS connection type - WAP OTA SyncML Settings: SyncML settings are used to provide
handsets with basic settings needed to establish a sync session with a sync
server.
- OMA OTA Settings: OMA OTA settings are used to provide handsets
with basic settings.
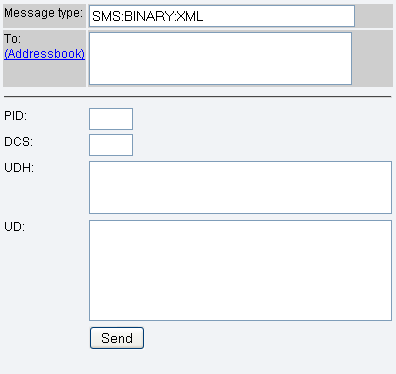
- Binary XML: You can specify the binary message data in XML format.
Dig deeper!
People who read this also read...
- Technical datasheet of Ozeki NG SMS Gateway
- Learn the key features of the software
- Find out the SMS features of the SMS gateway
- Learn the MMS functions of Ozeki NG SMS Gateway
- Browse through the functions of main menu
- Be familiar with Management Console
- Learn the functions of Messages view
FAQs
What kind of messages can I send to a mobile device?
SMS, EMS, MMS, E-mail
- SMS (Short Message Service): SMS is widely supported by almost all mobile devices and networks worldwide, including GSM networks. An SMS message can contain short text only, and it can be sent to cellphone numbers globally. SMS messages are routed internationally.
- EMS (Enhanced Messaging Service): EMS is an “enhanced SMS” feature. It is supported by some manufacturers (such as Nokia, SonyEricsson, etc.), but not all. EMS is available on all GSM networks. While most newer mobile phones can receive EMS, it is not as widely accepted as standard SMS. EMS messages are routed internationally.
- MMS (Multimedia Messaging Service): MMS is a multimedia message format. Similar to SMS, it can be pushed to cellphones. Similar to email, it can contain attachments such as pictures, videos, sounds, documents, and applications. MMS is supported by most networks and mobile phones, but it is often not routed internationally.
- Email: Although not a classic mobile message type, email is supported by many new smartphones. The challenge with email is that the mobile phone must have Internet connectivity to download new messages. The mobile device needs to log in to the Internet each time to check for new emails.
What kind of SMS message types are available?
The available SMS message types supported by Ozeki NG SMS Gateway include:
- Text SMS: Contains standard text formatted in the GSM 7bit SMS alphabet, with a standard length of 160 characters.
- Flash SMS (Class0 SMS): A display-only SMS that is immediately displayed on most mobile phones and not saved to the SIM card or phone memory.
- Unicode text SMS: Used for characters not in the standard GSM 7bit SMS alphabet, with a maximum length of 70 characters. Commonly used for languages such as Arabic, Chinese, Hebrew, Cyrillic, and Latin with non-standard characters.
- Multipart SMS: Used when the size limit of an SMS is exceeded, segmenting the message into multiple parts. For standard text messages, each segment can contain up to 153 characters, and for Unicode messages, up to 63 characters. Multipart SMS is also used for long binary content.
- Binary SMS: Used to carry binary data, with a maximum of 140 bytes (octets) available.
- WAP Push/webpage link and WAP Push/webpage bookmark: Contains text and a hyperlink, allowing recipients to open the link with a single touch if their mobile phone has an integrated web browser.
- Phone and network settings: Sent in SMS messages, mainly used by mobile network operators for Over the Air Configuration (OTA) to configure handsets.
- VCard SMS: Contains business card information and can be easily saved in the phone's address book.
- VCalendar SMS: Contains a calendar entry.
- Indication SMS messages: Used to indicate voicemail, fax, or videomessage waiting status for cellphones. There are two types: one to set and the other to clear the indication.
What is EMS?
EMS stands for Enhanced Messaging Service. It serves as an extension of the SMS
(Short Message Service) standard. EMS was introduced to address a limitation of
SMS: by default, SMS messages cannot include rich-media content such as pictures,
animations, and melodies.
An EMS message can include:
- Pictures
- Animations
- Melodies
- Other content
What is an MMS?
MMS stands for Multimedia Messaging Service.
MMS allows sending messages that include multimedia objects such as:
- Images
- Audio
- Video
- Rich text
What kind of attachments can I use in an MMS?
MMS supports various types of attachments, including:
- Text
- Pictures
- Sounds
- Videos
- Applications
- Other file types
What happens if the recipient number does not exists?
If the recipient number you send an SMS to doesn't exist, the outcome will depend on your specific SMS provider and their error handling settings. Here are the two most common scenarios:
- Delivery Failure Notification: In many cases, you'll receive a notification that the message delivery failed. This might come as a text message yourself, an email, or an update within your SMS platform. The notification might even include an error code that explains the specific reason for failure (e.g., "recipient number invalid").
- Silent Failure: Some providers might not send you any notification if the message can't be delivered. The message will simply disappear without reaching the recipient, and you'll have no way of knowing unless the recipient tries to contact you about the missing message.
Here's a tip: It's a good practice to double-check recipient numbers before sending messages to avoid these failed deliveries. Some SMS platforms also offer features to verify phone numbers before sending, which can help ensure your messages reach the intended recipient.
What happend if the recipient has switched off his mobile?
When you send a text message to a recipient who has switched off their phone, a few things can happen depending on your SMS provider and their network settings:
- Message Queued: Some providers might queue the message on their servers. Once the recipient turns their phone back on and regains signal, the message will be delivered. This queuing time can vary depending on the provider's policies, but it's usually a few days at most.
- Delivery Failure After Timeout: If the recipient's phone remains off for an extended period (determined by the provider), the message delivery might eventually fail. You might receive a notification about the failed delivery, similar to the situation with a non-existent number (as mentioned previously).
- Silent Failure: As with non-existent numbers, some providers might not provide any notification if the message can't be delivered due to a switched-off phone. The message will simply remain undelivered until the phone is turned on.
Here's a tip: If it's important for your message to be delivered urgently, consider trying to contact the recipient through another channel, like a phone call or email. You can also follow up with a text message later to see if they've received it.
More information
- Key features of SMS Gateway
- Menu functions of Ozeki NG SMS Gateway
- Management Console of Ozeki NG SMS Gateway
- Messages view functions of Ozeki NG SMS Gateway
- Sending SMS messages from Ozeki NG SMS Gateway

 Sign in