CIMD2 Connection
In this chapter you can find out how to install and configure the UCP IP SMS protocol for SMS messaging using the Ozeki NG - SMS Gateway software. In addition to an introduction containing general information about this protocol, this page provides detailed installation and configuration instructions.

Introduction
As you can read on the Service Provider Connections page, you need to install and configure one or more service provider connections for SMS messaging using Ozeki NG - SMS Gateway. One of the service provider connections supported by the software is the CIMD2 connection.
The Computer Interface Message Distribution (CIMD) protocol was introduced by Nokia. The Nokia SMS Center includes an CIMD2 interface that transfers messages between applications and the Nokia Short Message Service Center (SMSC).
CIMD2 is version 2 of the Computer Interface to Message Distribution protocol. The CIMD2 interface is suitable for client applications that send and retrieve messages over TCP/IP sockets, such as Ozeki NG - SMS Gateway.
One of the advantages of using CIMD2 connections is that you can specify the sender address of the message. The sender address can be a custom phone number or a short word containing alphanumeric characters. (See the instructions about the overridable checkbox below.) Note, however, that some GSM service providers restrict the use of this option.
Another advantage of CIMD2 is that it allows sending messages of every type the GSM network can carry. It can be used to send binary SMS messages (operator logos, ringtones), WAP Push messages, as well as other types of messages. (Check out the Appendix for links to pages about different message types.) Concatenated SMS messages and various alphabets can also be used.
A CIMD2 connection can be used through an IP link. This link can be a leased line or the Internet. Optionally the link can be protected by VPN.
If you wish to use CIMD2 to connect to your service provider, you need to receive the following information from the service provider:
| IP address of the SMSC |
| Port number of the SMSC |
| User name |
| Password |
Installation and configuration
You can install and configure this connection using the graphical user interface of Ozeki NG - SMS Gateway.
To start installing and configuring a UCP service provider connection, click the Add button in the top right-hand corner of the Service providers panel on the left of the Management Console interface. (To find out how to open this interface, check out the QuickStart Guide.)
You can also add a service provider connection by clicking the Add service provider item in the Service providers menu.
After you have clicked one of these, the Add service provider panel will show up on the right of the interface. The panel contains a list of protocols you can install and use for communication with an SMS service provider.
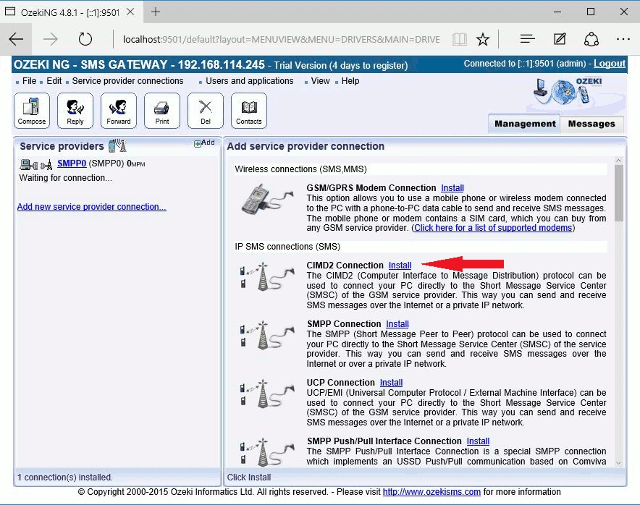
To select the CIMD2 protocol, click the Install link in the respective entry in the list (Figure 2).
When you have installed the CIMD2 Connection, the Configuration panel will show up on the right of the interface. The first tab of the panel is the CIMD2 settings tab, which consists of a Connection and an Identification section.
First, specify the CIMD2 server settings. This information is provided by the GSM service provider whose service you have subscribed to. The connection parameters are the host name (or IP address), the port number, a username and a password. The hostname refers to the server that Ozeki NG - SMS Gateway will connect to. This specification allows you to customize a connection. The valid values of the port parameter range from 0 to 65535. The username and the password are text attributes which can also include numerical characters. Service providers often use the phone number of the service or the port number as the username. These specifications are an essential part of the SMSC authentication method. Enter the information in the respective edit boxes (Figure 3).
In the Use source port edit box you can specify the source port. Only use a value other than 0 if your operator prompts you to do so.
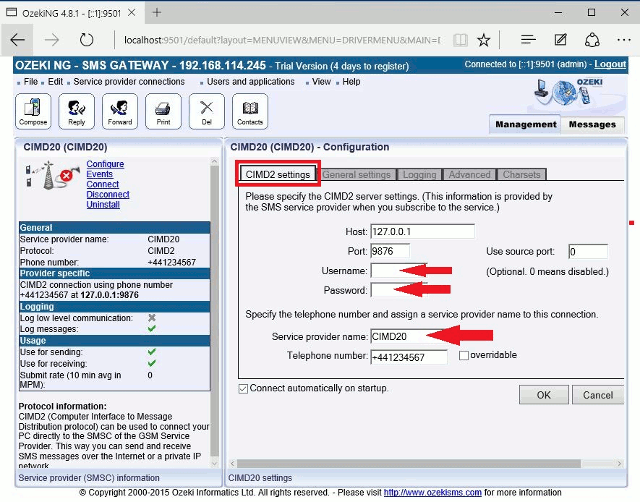
Then, specify the telephone number assigned to this connection and the service provider name. To facilitate identification and to avoid confusion, you should name the connection after the GSM service provider. E.g., if you have set up an SMPP connection with Vodafone, it is advisable to name it "Vodafone". Also, note that different connections should be given different names. If you have different connections from the same service provider, you can use different but similar names for them, e.g.: "Vodafone1", "Vodafone2" (or something of the like). However, some load balancing solutions require an identical name for different connections. For details, visit the Load Balancing and the Load Balancing for SMPP v3.3 page.
Enter the information in the respective edit boxes. Remember to enter the phone number in international format: starting with "+". You can check the overridable checkbox to the right of the Telephone number edit box. This ensures that you can replace the phone number specified in the Telephone number edit box with a different one to be displayed as the sender of an outgoing message. You can also replace the number with (alphanumeric) text consisting of a maximum of eleven (11) characters. Therefore, when a message is sent out, e.g. using the Database user, you can specify any different phone number or a name to be displayed as the sender of the message.
To perform general settings related to sending and receiving SMS messages using this protocol, click the General Settings tab. This will open a panel consisting of the Sending and receiving the Timeout handling and Communication link management section.
In the first section of the panel you can check any or all of the checkboxes. Which one(s) to check depends on what you wish to use this connection for and whether you need a delivery report. You can choose to use the connection for only sending or only receiving SMS messages (or both sending and receiving), and you can choose to request a delivery report for outgoing messages (Figure 4).
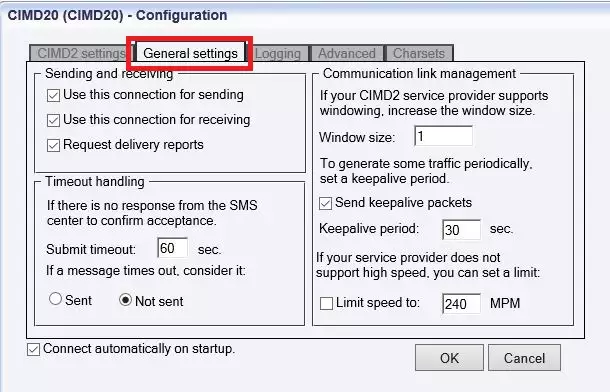
In the Timeout handling section of the tab you can make choices and specifications to handle your connection to the SMS Center and the status of your SMS messages.
In the Submit timeout edit box you can specify the maximum waiting time for an SMS Center response confirming that your message has been successfully submitted. Successful submission means that the SMS Center has accepted the message for delivery. You can specify the waiting time by giving the number of seconds in numerical characters representing any positive whole number. If you are content with the default specification (60 seconds), leave this edit box unchanged.
You can choose how to consider a message you have sent if there is no response from the SMS Center after the specified length of time. Select one of the three radio buttons.
- Select Sent to consider a message sent even if there is no response from the SMS Center.
- Select Not sent to consider a message not sent if there is no response from the SMS Center.
In the right section of this configuration panel you can manage communication links. At first, in "Windows size" line you can increase the window size, if your SMPP service provider supports windowing. The windowing feature of Ozeki NG - SMS Gateway enables the program to initiate more than one operation before receiving responses. For stop-and-wait flow control, use window size 1. (The maximum window size is 128.) You can set how many protocol messages can be sent out before the SMS Center responds to them. Protocol messages can include SMS messages, keepalive packets, etc. The default value is 1. If you set this number too high, your SMS messages may be discarded, as most GSM service providers try to prevent their networks from being overloaded (Figure 5).
If you check the checkbox in the Communication link management section, you can make the program send keepalive packets to maintain connection. Proxy servers will drop a connection after a short period of time if there is no activity on it. Keepalive packets are sent during idle periods to keep the connection open.
In the Keepalive period edit box you can specify the maximum length of idle connection between the Ozeki NG - SMS Gateway and the SMSC. You can specify it by giving the number of seconds in numerical characters representing any positive whole number. If you are content with the default specification (30 seconds), leave this edit box unchanged.
You can also check the Limit speed to checkbox (you can provide the exact time in MPM) if your service provider does not support high speed.
To configure logging, click the Logging tab in the Configuration panel.
First, you can choose whether to make the program write log entries about sent and received messages in human readable format and/or log low level communication and/or log in hexadecimal format. Choosing the second option will make the program produce logfiles containing binary codes representing the communication data. You should check at least the Log sent and received messages in human readable format checkbox, as logfiles can be useful in debugging communication problems (Figure 5).
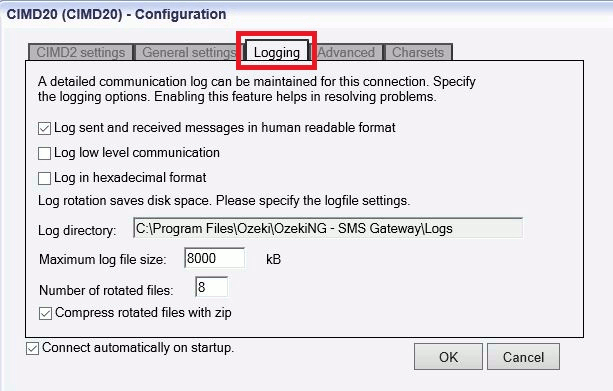
You can also make specifications for the size and the number of available logfiles. Log rotation saves disk space, as it ensures that older (and probably no longer needed) logfiles will be automatically deleted from the log directory, which is specified in the Log directory text box. By default, the access path to the logfiles is: C:\Program Files\Ozeki\OzekiNG - SMS Gateway\Logs
In the Maximum log file size text box you can specify the maximum size of a logfile. Once this size is reached, a new logfile will be created. Specify the number of kilobytes for the size of a logfile by entering a positive whole number. By default, the maximum logfile size is 8000 kB.
In the Number of rotated files text box, specify the maximum number of rotated logfiles that are saved. Specify this number by entering a positive whole number. By default, the number of logfiles that are saved is 5 (see Figure 5 above).
If you are content with the default specifications, leave the text boxes unchanged.
The Advanced tab contains three checkboxes (Figure 6).
- The Include checksum field for protocol messages checkbox allows you to make the program use a checksum to check the integrity of an SMS message. By default, this checkbox is checked.
- Check the Replace STX and ETX to operate with custom protocol implementations checkbox to avoid using the STX character, and to replace the ETX with the CR/LF (newline) character.
- Check the Don't include the originator address when submitting messages checkbox.
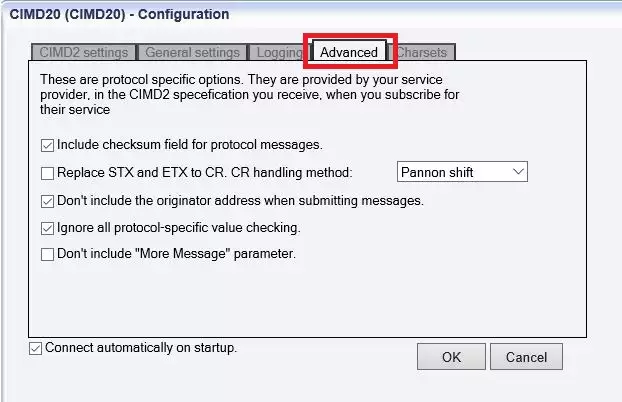
The Include checksum field for protocol messages checkbox allows you to make the program use a checksum to check the integrity of an SMS message. By default, this checkbox is checked.
- Check the Replace STX and ETX to CR. CR handling method checkbox.
- Check the Don't include the originator address when submitting messages checkbox
The Configuration panel for service provider connections contains a Connect automatically on startup checkbox (in the bottom left-hand corner). If it is checked, Ozeki NG - SMS Gateway will automatically initiate a connection with the SMS Center when the program has started. If this checkbox is not checked, the connection has to be initiated manually.
To initiate the connection manually, click the Connect link in the panel of the service provider connection (Figure 7).
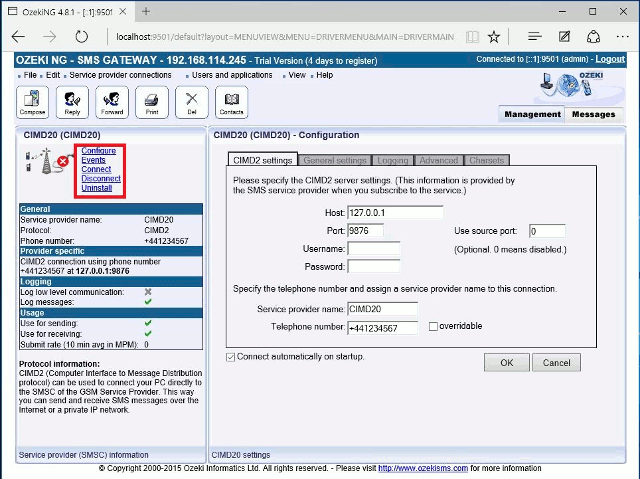
You can open the panel of a service provider connection by clicking its name in the Service providers panel in the Management Console.
The panel of a service provider connection consists of three sections.
- In the upper section you can find the name of the service provider connection (with the name of its protocol in brackets).
- You can see an icon showing if the service provider connection is connected. If it is not, the icon is marked with an "x".
To the right of the icon you can find links to perform different operations.
- Configure: to configure or modify the configuration of an installed service provider connection. Clicking this link will take you back to the Configuration panel.
- Events: to view the logging of the latest server events related to the service provider connection. Clicking it will bring up the Events panel containing the logging of the latest server events.
- Connect: to connect the service provider connection with the SMS Center.
- Disconnect: to disconnect the service provider connection from the SMS Center.
- Uninstall: to uninstall the service provider connection.
In the middle section of the panel you can see some of the most important configuration information.
- The options that have been (re)activated during the configuration are marked with a tick.
- The options that have not been activated or those that have been deactivated during the configuration are marked with an "x".
In the lower section of the panel of the service provider connection you can read some information about its protocol.
FAQs
What is a CIMD2 connection?
When it comes to sending and receiving SMS messages through software applications, communication protocols play a crucial role. In the world of Nokia SMS Centers, a specific protocol called Computer Interface Message Distribution (CIMD) facilitates this communication.
Evolution of CIMD:
- CIMD: The original version of CIMD laid the groundwork for message exchange.
- CIMD2: An upgrade, CIMD2 offers a more robust and efficient way for applications to interact with the Nokia SMS Center.
Benefits of CIMD2:
- TCP/IP Connectivity: CIMD2 leverages TCP/IP sockets, a widely used and reliable network communication method. This ensures smooth data transfer between applications and the SMS Center.
- Ozeki NG Compatibility: Good news! Ozeki NG SMS Gateway, a popular SMS management software, is compatible with the CIMD2 interface. This allows you to seamlessly integrate Ozeki NG with your Nokia SMS Center for sending and receiving SMS messages.
More information

 Sign in