SMS Autoreply from Database
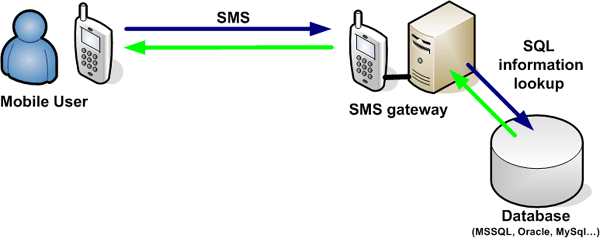
This guide gives you information on how to create an autoresponding application that uses information stored in your database. The solution presented on this webpage can be used with any database server (Microsoft SQL, Oracle, MySQL, Sybase, etc...). This solution is ideal to create the following service (Figure 1):
- A mobile user sends in a keyword in an SMS message to the system.
- The system looks up the response SMS message from the database based on this keyword.
- The system sends the response SMS message back to the mobile user.
I assume you already have a working service provider connection configured, that is capable of sending and receiving messages (e.g. you have a GSM modem attached to your server computer and your GSM modem is configured in Ozeki NG).

Step 1 - Setup the Autoreply Database User
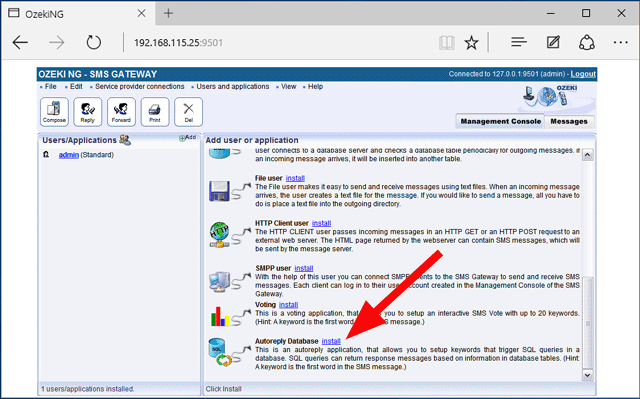
In order to create the explained service first you need to install an Autoreply Database User (Figure 2). Detailed information about how this user can be installed is available in the "Autoreply Database User installation guide".

Step 2 - Create the database layout
The next step is to create your database table, that stores the response SMS messages (Figure 3). In our example we use Microsoft SQL Express as the database server. The following guide gives you information on how you can create a database layout using SQL Express: Create database layout for SMS autoresponses. In our example we use the following table. (Of course you can change the table layout according to your needs and you can use multiple database tables.)
> select * from autoreplymessage; id keyword msg ---------- ------------------------------ ------------------------------------- 1 default There is no data for this keyword. 2 red Red is a good color. 3 blue Blue is not the best option. (3 rows affected) |
Step 3 - Configure the Autoreply Database User to use your database
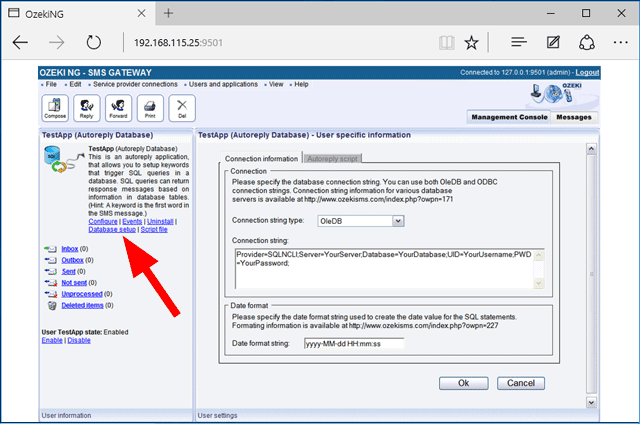
When your database is ready, you need to enter the database connection information (connection type and connection string) into the database settings configuration form of the Autoreply Database user. This configuration form can be opened by clicking on the "Database setup" menu item (Figure 4).

On this form you can select the database connection type and you can enter the connection string. In our example (for SQL Express) the connection information that should be used is:
Connection type: OleDb Connection string: Provider=SQLNCLI;Server=.\SQLEXPRESS;User ID=ozekiuser;password=ozekipass; Database=ozeki;Persist Security Info=True |
For other database servers, such as Oracle, MySQL, etc..., you can find information about how to format the connection string in the Database Connection Strings guide.
Step 4 - Write the autoresponding command script
The final step to make SMS information query possible is to write the script file. The script file is a plain text file that controls which SQL command should be executed when an incoming SMS arrives. You can edit the scriptfile with notepad or any other text editor. In our example the location of the script file is:
C:\Program Files\Ozeki\OzekiNG - SMS Gateway\config\TestApp\sqlscript.txt
The contents of the script file in our example has three sections (Figure 5). The first two sections are triggered for a response SMS if the keyword "RED" or "BLUE" is received in an SMS message. The final section creates the default response message if something else was received.
| C:\Program Files\Ozeki\OzekiNG - SMS Gateway\config\TestApp\sqlscript.txt |
k^RED SELECT '$sender',msg from autoreplymessage where keyword='red' k^BLUE SELECT '$sender',msg from autoreplymessage where keyword='blue' k.* SELECT '$sender',msg from autoreplymessage where keyword='default' |
Autoreply Database user can recognize the following keywords:
| Keyword | Value | $originator | It is replaced to the sender telephone number of the messages |
|---|---|
| $sender | It is replaced to the sender telephone number of the messages (an alias for originator) |
| $recipient | It is replaced to the telephone number that received the message |
| $receiver | It is replaced to the telephone number that received the messages (an alias for recipient) |
| $messagedata | It is replaced to the message text |
| $keyword | It is replaced to the keyword in the message |
| $after | It is replaced to the message the message text after the keyword in the message |
| $senttime | It is replaced to the timestamp, that represents when the message was sent |
| $receivedtime | It is replaced to the timestamp, that represents when the message was received |
| $messagetype | It is replaced to the message type (in most cases this will be SMS:TEXT) |
| $id | It is replaced to the unique string identifier of the message |
| $operator | It is replaced to the name of the service provider connection that received the message |
| $1 | The first word in the message. You can use $2 to refer to the second word, $3 to refer to the third word, etc... |
The structure of the autoreply script is explained in the following documents:
Script file structure for SMS information query from database
Sample script file for SMS information query from database.
Step 5 - Testing the solution
After this is done, you can test the solution by sending an SMS message to your SMS gateway. The SMS gateway will forward the message to the Autoreply Database User, where the command script will be executed for the response. The response will be returned by an SQL SELECT query defined in the script file. After the appropriate SQL SELECT is executed the response messages will be sent back to you in SMS. To track what is going on, read the logs in the following directory:
C:\Program Files\Ozeki\OzekiNG - SMS Gateway\LogsMore information

 Sign in