How to send and receive SMS messages from a database application
This guide explains how you can setup Ozeki NG SMS Gateway to communicate with your database server. If the steps in this guide are followed, you will be able to send (or receive) SMS messages from a database application. All you have to do is insert data (or read data) from the appropriate database tables.
This guide gives you the simple steps for the configuration.
Introduction
Ozeki NG - SMS Gateway can be used to send and receive SMS messages using a database server with the help of SQL queries. This is possible because database servers allow the sharing of database tables between two applications.
Database table layouts:Other database related information:
To be able to send SMS messages from a database application you need to create a database table called ozekimessageout. You can put an outgoing message into this database table using an SQL INSERT command. Ozeki NG - SMS Gateway will periodical check (poll) the ozekimessagout table with an SQL SELECT command, and if it finds a new entry, it will send the SMS message.
You can receive SMS messages in a similar way. You need to setup a database table called ozekimessagein. If an SMS message is received from a mobile phone, it is inserted by Ozeki NG SMS gateway into the ozekimessagein database table (Figure 1). You can use an SQL SELECT to read this message.
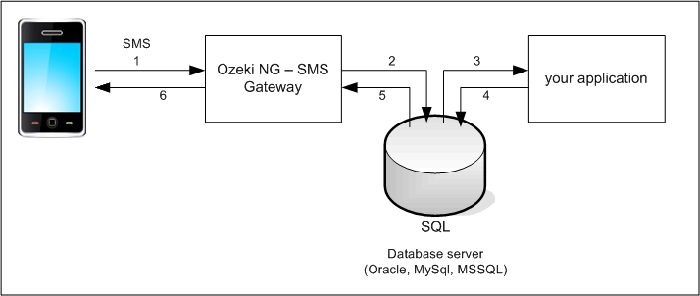
In order to get this configuration working, you need to have a database server (such as Oracle, Access, MySql, MS SQL, Postgres, Sybase, etc.) installed, and you need to create two database tables: ozekimessageout and ozekimessagein. The ozekimessageout table is used for sending, while ozekimessagein is used for receiving SMS messages. To find out how to create the ozekimessagein and the ozekimessageout table for different database servers, read the respective pages related to the different database users. Check out the links at the end of this introduction.
Once you have created the database structure, you need to connect Ozeki NG SMS Gateway to your database. To establish a connection you can use an ODBC connection or an OLEDb connection. (To setup the connection you might have to install and configure an OleDB or an ODBC driver. For example MySQL requires the MyODBC Database driver to be installed. For Microsoft SQL Express, Microsoft SQL Server and Oracle, Microsoft Windows has a built in OleDb drier, so you do not have to install a driver separately).
The connection can be configured with a database connection string. This connection string includes the database driver name, the IP address, the username and the password and the name of the database. More information about the database connection string can be found in our "Database connection strings" manual.
If you have figured out the connection string for your database server, you need to install and configure a database user in Ozeki NG - SMS Gateway. This is a virtual user that will communicate with a specified database server and will provide you the SQL SMS Gateway functionality.
For more information about different databases, check out any of the following links:
How to install a database user
You can install and configure a database user with the graphical user interface of Ozeki NG - SMS Gateway. Follow the instructions below.
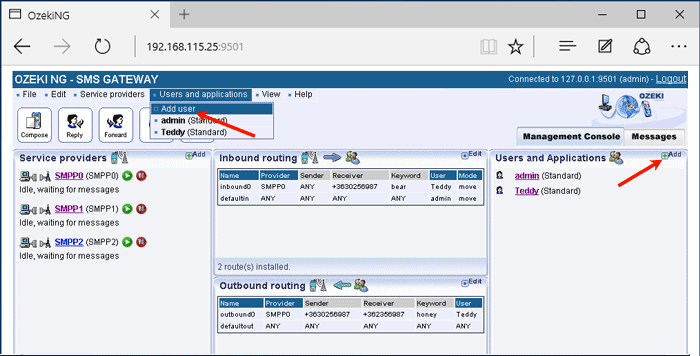
To start installing and configuring a database user, click the Add button in the top right-hand corner of the Users and Applications panel on the right of the Management Console. (To open the Management Console interface, click the Management Console tab. For more information, check out the User Interface page.) You can also add a user by clicking the Add user item in the Users and applications menu. (Figure 2).
This will bring up an interface consisting of two panels.
- The panel on the left contains a list of users that have been installed. In the bar at the bottom of the page you can read how many users have been installed.
- The panel on the right contains a list of users that can be installed.
- Each user in the left-hand panel is listed with a unique name (and the user type stated in brackets).
- Each user in the right-hand panel is listed with the name of its type and a brief description of what it can be used for.
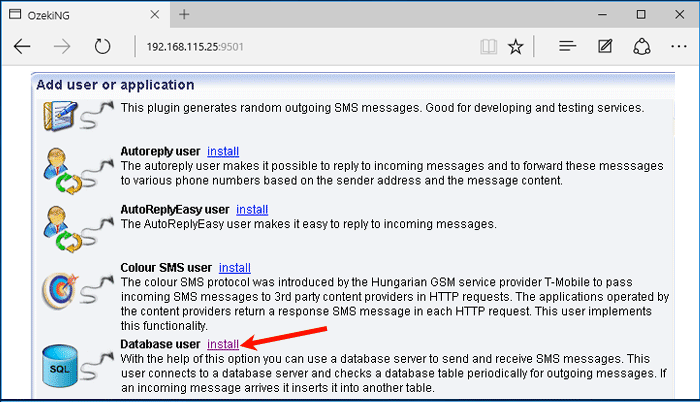
To add a database user, click the Install link in the respective entry in the list of installable users and applications (Figure 3).
This will open a panel asking you to give the database user a unique name (Figure 4).
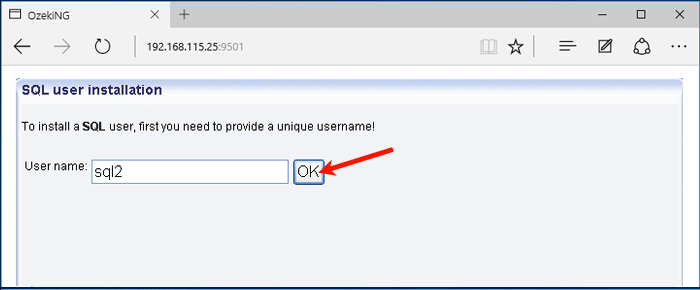
Enter a unique name in the User name edit box, and click OK. Then the installation is finished, and the name of the database user will show up in the list of users on the left in the panel.
How to configure a database user
Once you have installed a database user, you can start to configure it. After you have provided a unique name for the database user and clicked OK (see Figure 4 above), the Configuration panel will open.
The first tab that will show up is the Database connection tab (Figure 5).
- In the Connection section, select the connection string type in the Connection string type dropdown menu. Make sure that the connection you specify is accessible for the system user account.
- For Open Database Connectivity, select Odbc.
- For Object Linking and Embedding Database, select OleDb.
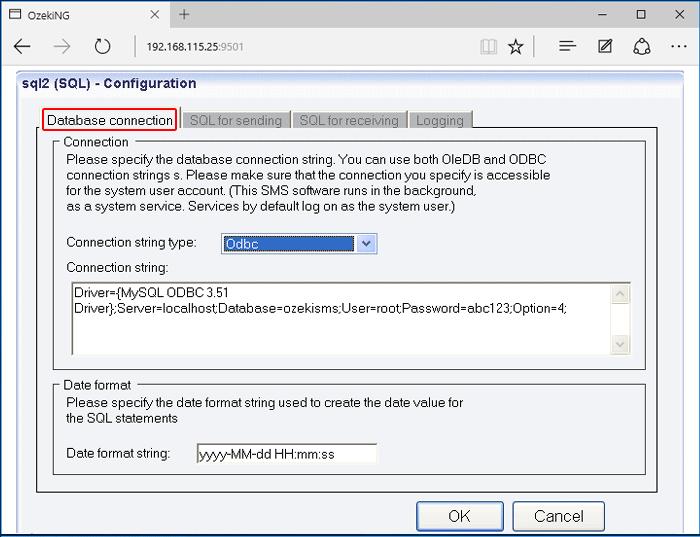
In the Connection string template, modify any variables if necessary. For instance, as you have probably changed the username and password, you will need to modify them in the template. If Ozeki NG - SMS Gateway and the database reside on the same server, "localhost" can be used to describe the database location. If they do not reside on the same server, you need to specify the database location by replacing "localhost" with the IP address.
Different database servers require different connection strings. By default, this template contains the connection string of the MySQL database server. For information about connection strings of other database servers, check out Appendix B - Connection Strings.
The connection string for the Oracle SQL server is:
Provider=MSDAORA.1;Password=YourPassword;User ID=YourUserID;Persist
Security Info=True
The connection string for the MS SQL server is:
Provider=SQLNCLI;Server=YourServer;Database=YourDatabase;UID=YourUsername;
PWD=YourPassword;
The connection string for the Sybase / SQL Anywhere Server is:
Provider=ASAProv.90;UID=MyUsername;PWD=MyPassword;DatabaseFile=DatabaseFileLocationOnYourComputer.db;
EngineName=Yourdbenginename;Start=YourDatabaseBinaryLocation.exe -c 32M;AutoStop=Yes
The connection string for the Postgre SQL server is:
DRIVER={PostgreSQL};SERVER=YourServerIP;port=5432;DATABASE=YourDatabaseName;
UID=YourUsername;PWD=YourPassword;
Additional connection strings can be found in Appendix B - Connection Strings.
In the Date format section, specify - in the Date format string edit box - the date format string used to create the date value for the SQL statements. The default date format string is yyyy-MM-dd HH:mm:ss. In the date format string, yyyy stands for the year as a four-digit number. If the year has more than four digits, only the four low-order digits appear in the result. If the year has fewer than four digits, the number is padded with leading zeroes to achieve four digits. (Note that for the Thai Buddhist calendar, which can have five-digit years, this format specifier renders all five digits.)
MM stands for the month as a number from 01 through 12. A single-digit month is formatted with a leading zero.
The dd string stands for the day of the month as a number from 01 through 31. A single-digit day is formatted with a leading zero.
HH stands for the hour as a number from 00 through 23, that is, the hour as represented by a zero-based 24-hour clock that counts the hours since midnight. A single-digit hour is formatted with a leading zero.
The mm string stands represents the minute as a number from 00 through 59. The minute represents whole minutes passed since the last hour. A single-digit minute is formatted with a leading zero.
The ss string stands for the seconds as a number from 00 through 59. The second represents whole seconds passed since the last minute. A single-digit second is formatted with a leading zero.
If you are content with this date format, leave the default date format string unchanged. If you wish to change it, rearrange the format specifiers. For example, you can put dd-MM-yyyy HH:mm:ss instead of the default arrangement. For information, about the different date format strings you can use, check out the Date Format Strings page. When you have finished configuring the database connection, click OK.
To send SMS messages using this connection, you need to make settings in the SQL for sending tab. Click the SQL for sending tab (Figure 6).
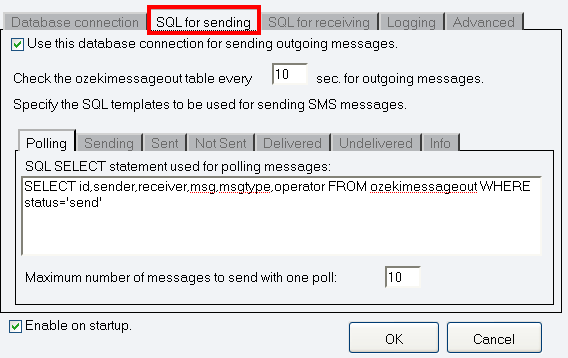
In the upper section of the panel you have opened, you can see a checkbox. By default, it is checked, and it should be checked if you use this database connection for sending outgoing messages. (To stop using this connection for sending outgoing messages, uncheck the checkbox.)
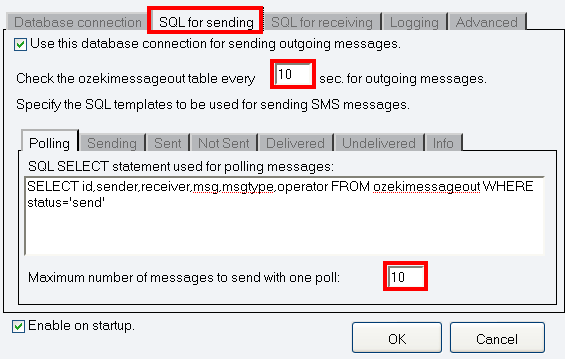
Below this checkbox you can specify how often Ozeki NG - SMS Gateway should check the ozekimessageout table for outgoing messages. Specify the frequency in seconds by entering a positive whole number in numerical form. If you are content with the default value (10), leave this edit box unchanged.
In the lower section of this panel you can specify the maximum number of messages to be sent out with one poll. By default it is 10. If you are content with this default value, leave the edit box unchanged (Figure 7).
If Maximum number of messages to send with one poll is 10, it means that 10 messages will be sent out with 1 poll. If there are more than 10 messages to be sent, then all the messages will be polled. If there is no messages left, the system will stop for 10 seconds (since it is the default value for checking outgoing messages). For example, if there are 100 messages, there will be 11 polls. (11 polls: 10 messages are sent with 1 poll. Then 100 messages will be sent with 10 polls. Plus there will be 1 last poll for checking for outgoing messages.) In this way, if there are 99 messages there will be 10 polls, etc.
In other words it is ensured that messages will be sent out even if the default number of messages to be sent with one poll is set to 10 but there are more than 10 messages waiting for sending.
In the lower section, you can specify SQL statements
related to the polling and the status of outgoing messages.
Modify any variables in the templates, or if you are content with them,
leave them unchanged.
The statement in the Polling template describes the way of selecting outgoing messages.
- The statement in the Sending template is used if the polling has been successful.
- The statement in the Sent template is used if the message has been accepted by the service provider.
- The statement in the Not sent template is used if the message has not been sent.
- The statement in the Delivered template is used if the message has been delivered to the recipient phone number.
- The statement in the Undelivered template is used if the message has not been delivered to the recipient phone number.
For detailed description of SQL statements please go to Detailed description of SQL statements page.
To receive SMS messages using this connection, you need to make settings in theSQL for receiving tab.Click the SQL for receiving tab (Figure 8).
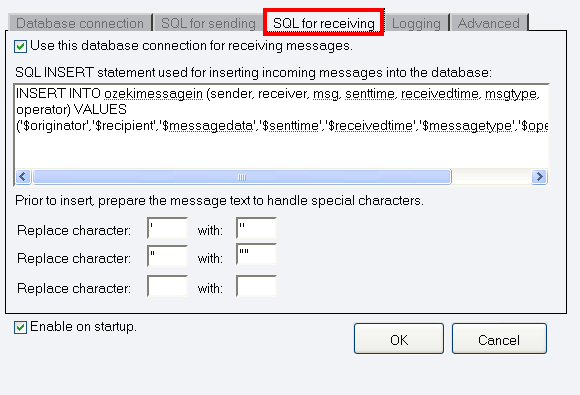
In the upper section of the panel you have opened, you can see a checkbox. By default, it is checked, and it should be checked if you use this database connection for receiving incoming messages. (To stop using this connection for receiving incoming messages, uncheck the checkbox.)
In the lower section of the panel, you can see a template containing an SQL INSERT statement used for inserting incoming messages into the database.If necessary, modify any valuables in the statement. If not, leave it unchanged.
Below the template you can find three pairs of edit boxes that allow you to make the program prepare the message prior to insert. This may be useful to handle messages containing special characters.
Each pair consists of one edit box (on the left) for the character to be replaced, and one (on the right) for the characters that will replace the character on the left. By default, the boxes contain the most problematic special characters to be replaced and those to be used instead. Modify these settings if you wish to specify different characters.
You can also configure the logging related to the database user. Click the Logging tab to open the panel for logging settings. In the Logging section of the panel, you can find three checkboxes. You can choose to check any or all (or none) of them. Your choice depends on whether you want the program to log sent and received messages in human readable format, to log SQL SELECT statements and/or to log SQL UPDATE statements (Figure 9).
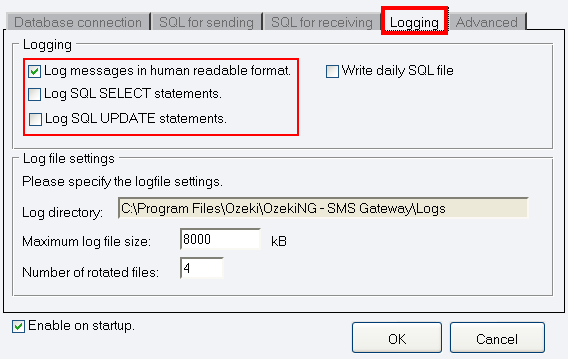
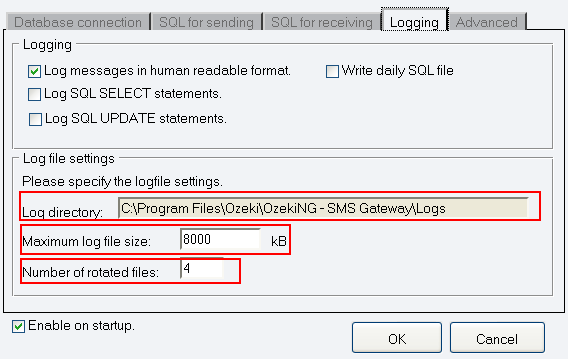
In the Log file settings section of the tab, you can make specifications for the size and the number of available logfiles. Log rotation saves disk space, as it ensures that older (and probably no longer needed) logfiles will be automatically deleted from the log directory, which is specified in the Log directory text box. By default, the access path to the logfiles is: C:\Program Files\Ozeki\OzekiNG - SMS Gateway\Logs
In the Maximum log file size text box you can specify the maximum size of a logfile. Once this size is reached, a new logfile will be created. Specify the number of kilobytes for the size of a logfile by entering a positive whole number. By default, the maximum logfile size is 8000 kB.
In the Number of rotated files text box, specify the maximum number of rotated logfiles that are saved. Specify this number by entering a positive whole number. By default, the number of logfiles that are saved is 4.
If you are content with the default specifications, leave the text boxes unchanged (Figure 10).
To modify the configuration or to view server events related to a database user, open the panel of the user's account. To do this, click the name of the user in the Users and Applications panel of the Management Console. In the panel of the user's account, click the link of the task you wish to perform (Figure 11).
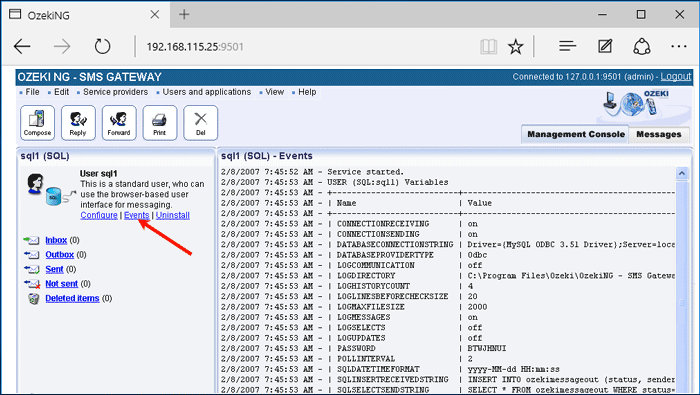
To configure or modify the configuration of a user, click Configure.
To view the latest server events related to a user, click Events.
To uninstall the user, click the Uninstall link.
FAQs
Does the software require a database server? Does it require any database connectivity drivers, such as ODBC drivers?
By default, the SMS Gateway does not require any database server or database connectivity software. However, you have the flexibility to configure the software for specific purposes:
SQL-SMS Gateway Configuration:
You can set up the software to act as an SQL-SMS gateway.
This configuration allows you to send and receive SMS messages using an SQL database server.
The software uses either an OleDb or an ODBC database connection.
It can attach to any compatible database server.
Logging Messages into a Database:
Additionally, you can configure the software to log incoming and outgoing messages into a database.
This feature helps track message history and provides a record of communication.
If you choose this option, the software will use the specified OleDb or ODBC connection to interact with the database.
What is an SQL database?
An SQL database is a way to store information in a structured format, like a giant spreadsheet. You can use SQL (a special language) to get information in and out of the database.
Can I save incoming SMS messages (sender address, message text, timestamp) in a database server (MySQL/MSSQL)?
Yes! This software lets you save incoming SMS details (sender number, message, time received) in a database server like MySQL or MSSQL.
I would like to specify different sender mobile numbers for outgoing messages. Is it possible to do it in the SQL tables to assign the sender mobile number?
Yes! You can specify the sender number for each message by using a special field named "originator" in your database table. There's a setting you need to enable in the software's configuration to allow this.
More information

 Sign in